

Hey, just thought this guide that I’ve created might help some of the newer habbox users on the forum. Please note there are other image uploading sites although I believe imageshack is one of the easiest and user-friendly sites around.
If you find any faults or wish to add on to my guide then please do so your input is much appreciated.
- Go to the user friendly image uploading website, www.imageshack.us
- Once you load the webpage you are given the option about selecting your image size, I recommend selecting “Optimize without resizing” although the choice is up to you.
- Once you have selected this you can now click the “Browse..” button as seen below.
- A window should appear displaying your pictures/documents folder on your computer, this is where you can select the image that you with to upload onto habbox.
- Select the image you wish to upload from your computer and click OPEN.
- If Your URL is displayed like the one above you can now click the “host it!” button on your screen.
- You should now be redirected to another page.
- You now have a choice of which URL link to use but I recommend using the TOP link on the bottom of the page.
- Now Copy the URL Link as seen above and return to your habbox window, where you should see if you are creating a new thread a button that looks like this
, click the button and a small window should appear.
- Paste the links URL that you copied from the imageshack webpage, and click OK.
Now Click “Preview Post” and you should see your image that you uploaded from your computer.
Hope This Helps.
Threads Merged and stuck by Neversoft. A BIG thank you to Notex for taking the time to do this guide.
Results 1 to 10 of 15
-
 Taking and uploading a screenshot guide.
Last edited by Neversoft; 05-08-2006 at 02:48 PM.
REMOVED
Edited by jesus (Forum Super Moderator): Please do not have text in your signature which is over size 4.
-
Taking a screenshot.
What is the Screenshot key?
The screenshot key is sometimes hard to find, but it is on ALL computers, in this picture, the key is circled (it says prt sc / sys req) NOTE: Keyboard make has been hidden.

how to transfer the image into something that u can see
The next step is to paste it into paint, if you dont have paint, any other picture editing program will do (fireworks photoshop ect.), you can paste it by holding the ctrl button and pressing the letter V on the keyboard or u can go to the menu bar at the top and click > edit > paste.
Cropping the Image
Cropping the image allow you to cut out any unnessecary things in the background for example, i wish to make a picture of the hotel out of all the other windows i have running, i have used PAINT to do so.
>> Link to image, i cannot embedd it as it stars it out << the link is a bit fuzzy but u can see what im getting at
  , select the square tool (as i have done in the link above) and select round the area in which u wish to crop.
Pasting the cropped image
Once you have selected the image using the square tool, click on the square and hold down Ctrl button on keyboard and press the letter C on keyboard or go to the top menu of the screen > edit > copy, then open a new window in paint (top menu > file > new) or alternavtively hold ctrl + n. Now all you need to do is paste the file into paint, u can do this like i said before (top menu > edit > paste or ctrl + v)
The finished arcticle

On tips how to upload please see the uploading thread by Notex
>>The guide<<
I hope you enjoy this guide and find good use from it
Thanks for Reading
~cj~
Threads Merged and stuck by Neversoft. A BIG thank you to Cj555 for taking the time to do this guide.Last edited by Neversoft; 05-08-2006 at 02:49 PM.
Coming and going...
Highers are getting the better of me
-
20-07-2006, 03:55 PM #3

- Join Date
- Aug 2005
- Location
- Standing on the rooftops...
- Posts
- 1,501
- Tokens
- 6
- Habbo
- ReviewDude
Taking a screenshot using a Mac Computer.
It's slightly harder to take a screenshot using a Mac computer, so this guide is for Mac OS X 10.
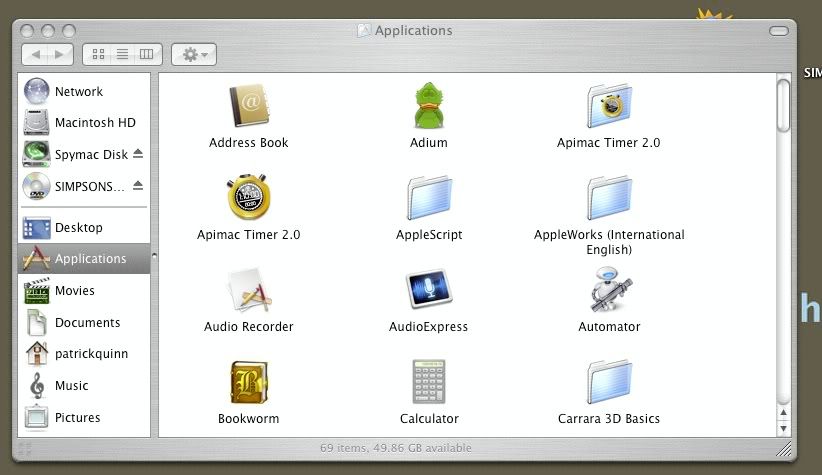
Open your finder, and go to Applications:
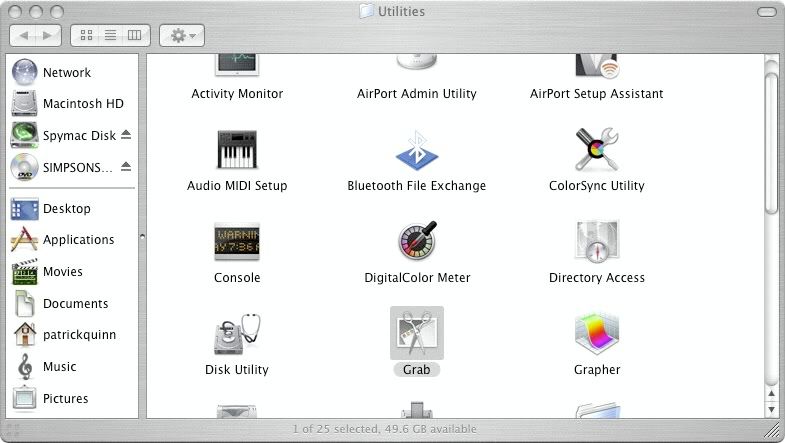
Scroll down to Utilities, and double-click, then double-click 'Grab':
Apologies for a lack of screenshots in this bit - it won't let me capture me capturing a screen. If that makes sense. Which it doesn't.
Okay, Grab has opened. If it's not already come to the foreground (you'll see Grab at the top-left, next to the blue apple, if it has). If that's not the case, click the icon on the Dock. A hint is to hold the icon down, and select 'Keep in Dock', to allow easy access in future.
Now, the fun bit, in Grab, go to 'Capture', and select:
Selection - You select what part of the screen to capture, by way of a drag-box.
Window - Take a picture of one window by itself, you can select the window after you take this option.
Screen - Takes a picture of the entire screen, amazingly.
Timed Screen - Takes a picture of the screen after 10 seconds.
Right, after you've taken the image, it'll come up in a popup Preview. Save it as whatever you want, to an easy-to-find location:
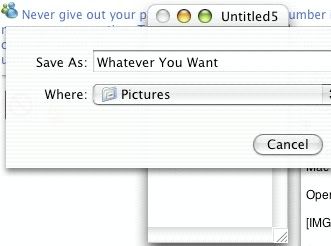
You're not done yet. Oh no, Steve Jobs thinks it's funny to make you save the image as a .tiff; which of course isn't accepted by ANY image upload site. So find your way to wherever you saved the file, and open it. Then go to File then Save As. Save it as a JPEG, or any other file type you want:

And you're done! Follow the instructions on how to host the image! Well done on choosing a Mac. You may not be able to take screenshots easily, but at least you can't get viruses either!
Way Number 2 - Easier Way
To take a full screenshot - press Command + Shift + 3
To take a partial screenshot - press Command + Shift + 4 then select where you want to capture.
These have a lot of problems, and often, in my own experience, are of poor quality or cause a lot of lag on the machine - if they work at all. Any pictures that are taken will display on your desktop as Picture 1, Picture 2 etc, which is another problem, being that you can't tell which is which, and it clutters up.
I hope you enjoyed my guide, please PM me if you notice any anomalies, or problems, or even if you want to say 'thanks'.
Threads Merged and stuck by Neversoft. A BIG thank you to ReviewDude for taking the time to do this guide.Last edited by Neversoft; 05-08-2006 at 02:49 PM.
The sunlight hurts my eyes...
~ Love, Patrick ~
Know your stuff about Habbo? I'm looking for high-quality article writers - PM for more!
I am Habbox's most trusted seller of VIP/Donator - over 100 months total sold without issue.
-
Both of the old threads have been merged and the posts moved to the top to avoid too much stickied threads.
Posts have been merged AGAIN, as another guide has been added.
A BIG Thanks to Notex, Cj555 and ReviewDude!
-
Thanks alot this was very helpfull

-
awsome guide:eusa_danc
Last edited by Stephhems; 01-09-2006 at 03:14 PM. Reason: miss-spelling
-
Thanks ALOT for this! :]
hi.
.
-
Woo well done


Wonna see something FAB \/ \/
-
Thanks for your comments. Its good to know im appreciated as well as notex and reviewdude
Last edited by MrCraig; 04-12-2006 at 08:55 PM.
Coming and going...
Highers are getting the better of me
-
Nice Notex


 <<
<< 


 Posting Permissions
- You may not post new threads
- You may not post replies
- You may not post attachments
- You may not edit your posts